originally written august 17th
woohoo!!! i got my creativity 350 project entered before deadline...but just barely!!! it only took three tries to get it submitted, thanks to our internet connection!! i'm just grateful it went through, even though it took three hours and i barely made it in with only 4 more hours to spare! *surprisingly, i wasn't the last entrant....i came in second to last!*
now the contest is in the hands of the voters!! if you would like to see all the projects that were entered go to the CREATIVITY 350 HOME PAGE!!! and if you want to vote on your favorite project, be warned that they hid the voting button on the very right-hand side of the screen, and you may have to scroll over to see it!!
*note that the link above takes you to the third page of entries. my socks are at the very bottom of that page!!
Monday, August 18, 2008


Sunday, August 17, 2008
i can check my creativity 350 project off the list!!!
originally written August 11th
i just finished knitting my creativity 350 socks this afternoon!!! ugh, i already feel relieved! i've been freaking out about not finishing on time, all the hours and work *and brain cells* that i put into those socks, there was no way in hell i wan't going to have them finished and entered in the contest! it's not as easy as knitting from a pattern, either! a certain design aspect may sound good in theory, but then you have to translate that into knitting. it's not all laid out in front of you, and if you mess up, you better pray that you even remember what you were doing so you can fix it *because if you're anything like me, you haven't written anything down!!!*. and if something doesn't work, then it's back to the drawing board for you! my poor brain, i never was any good at math. when i see a beautiful and intricate knitted garment, it blows me away- the amount of knowledge and time it must take to make such amazing pieces.
when i first started designing and knitting my socks for the contest, i was planning on keeping them a surprise until they were finished. that's why i never really gave any details on them which i'm sure some people have been scratching their heads at. as you all know, i couldn't keep them a secret long, especially with all of the obstacles i ran into, i was bursting at the seams to vent my frustration and get some advice! so here are the most basic details: the yarn i used to knit the socks is knit picks palette yarn in clover and natural (i can't remember the actual name of the cream/neutral yarn, but you get the idea!) i ordered one ball of each color and despite my constant fear and frequent blogging about running out of yarn, i was super relieved that i didn't!! i did however try to stretch the amount of yarn i had by using equal parts of both colors; mostly green on the legs and natural on the feet of the socks, as the background for the stripes.

i love the way these pictures turned out! my husband took them....who knew he was such a budding photographer!?!?
i used short row toes and heels on these socks, and learned some very valuable lessons them along the way: mainly that while knitting them you must concentrate!!! they are not suitable for mindless knitting in front of the tv OR in the presence of ANY small children who command your attention!! it is not easy or fun to go down a few rows and fix a mistake, i usually had to rip out the entire heel and start over. AND, use the damn stitch markers!!! even though we tend to think that we can do everything by ourself and rarely use markers anymore *at least that's what i was thinking!!* it makes the process infinitely easier, especially if you're not familiar with wrapped stitches, in a smaller gauge they are hard to distinguish from regular knit stitches. even if you are paying pretty close attention....
i also learned some new techniques with this project; intarsia, knitting backwards and intarsia in the round. i've already gone over intarsia and knitting backwards in some of my previous posts, but i haven't yet mentioned intarsia in the round. i found alot of different techniques online, but the one that i thought would be easiest to learn and execute in the short amount of time i had was one which incorporates yarn overs and decreases to simulate flat knitting. i found this great site that has a complete explanation of what makes intarsia in the round so problematic *until you know how to do it*. it also goes over a couple of the techniques all in one place so that you don't have to go to numerous sites to find them. if at all possible, you may want to have a swatch if you're reading the instructions for a technique that you plan on using so that you can follow along with her, otherwise it can get a little confusing.

this is the seam that is created by using the yarn over/decrease method of intarsia in the round. i actually like the way it looks, the effect is like a tiny corset, with the yarn overs on each side. i might use it in the futute as a design feature.
here is a VERY brief run-down of how the yarn over/decrease technique works: let's pretend we are knitting a sock, toe up. we knit the toe, the foot and the heel and then we want to knit an intarsia motif on the leg of the sock. we'll decide that we're going to put the "seam" on the back of the leg, straight up from the ankle. so we knit to the exact middle-back of the ankle, yarn over and then knit back the way you came (this is where you can use the knitting backwards, instead of turning and purling). you then knit the "second row" following your intarsia chart, until you reach the stitch before the yarn over. purl the last stitch together with the yarn over.
*TIP: if you're knitting backwards and you have a hard time figuring it out, you can turn your work around and pretend you're going to purl 2 together to see how to do it. AND you can do this for any stitch while knitting backwards, or if you get absolutely stuck and don't know what to do, just turn the work, purl it, turn it back around and continue knitting backwards!!*
once you've done your decrease you will be back on a knit row! since we decreased, we'll need to add another stitch, so at the beginning of the next row, yarn over. knit the "third row" following your chart and when you get back to the seam where the yarn over is, this time you'll be doing a SSK decrease. again, yarn over at the beginning of the row. continue on in this manner until you are finished with your intarsia motif and then you'll return to knitting circularly for the rest of the leg and cuff of the sock.

i did mention in once post that i was allowing myself a tiny bit of spinning time, only when the socks became brain-numbing and i needed a break. the wool i chose for this couldn't have been any better! i got the four ounces of wool *unknown breed, but wonderful nonetheless* from my june FOTM swap partner. the colors are so calm and relaxing, and it was the first time in a really long time that i allowed myself to spin without overthinking it. i didn't care what it looked like in the end, where or how the colors met up, how many WPI it was.... i let my mind wander, while serendipity took over. that's the best kind of spinning.
i did take the plying seriously though. dictatorially serious. i've been so frustrated with the fact that all of my yarns are at least slightly over-twisted and it really started to bug me. i know everyone says that a balanced skein of handspun is something that "comes with time" but i'm not one of those people who likes to sit around and wait. i'm a little more proactive.
to pin-point exactly what i was doing wrong, i would ply about a yard of singles and stop and do a ply-back test. it was then that i noticed something that was always there, but i had never paid any attention to: when you attatch a leader to your bobbin, you take it up through the flyer hook (or hooks) and then down through the wheel's orrifice. it was that very small couple of inches of yarn that led to my breakthrough!! i had plied a yard's length of singles, with my right arm extended out behind me. when i started the ply back, i noticed a reaction in the yarn between the oriffice and the bobbin: the second you bring your arm forward, you release the tension that you were holding the yarn under and in a matter of seconds, the yarn behind the orrifice would untwist, sometimes drastically.....but only with yarn that did not have enough ply twist!!!
but if i pulled about five inches back off the bobbin (towards me) and put more ply twist into it, it wouldn't unwind! in fact, if i watched it closely, you can see it either lose twist *not enough ply twist*, stay exactly the same *balanced yarn* OR extra twist from what i had just plied would travel BEYOND the orrifice and into that yarn. so i knew if it unraveled i needed to put more twist into my yarn and if it gained twist i had too much ply twist (which can be easily fixed by pulling about 5 more inches of yarn off the bobbin and the twist will even itself out a bit). it is a revelation for me, although i can't tell you how tedious it is to do this for an entire 4 ounces of fingering-weight singles!! of course, you wouldn't have to do it that way, you could use it periodically to test your consistency. i was just determined to spin a FULLY balanced yarn! and i did.


i just finished knitting my creativity 350 socks this afternoon!!! ugh, i already feel relieved! i've been freaking out about not finishing on time, all the hours and work *and brain cells* that i put into those socks, there was no way in hell i wan't going to have them finished and entered in the contest! it's not as easy as knitting from a pattern, either! a certain design aspect may sound good in theory, but then you have to translate that into knitting. it's not all laid out in front of you, and if you mess up, you better pray that you even remember what you were doing so you can fix it *because if you're anything like me, you haven't written anything down!!!*. and if something doesn't work, then it's back to the drawing board for you! my poor brain, i never was any good at math. when i see a beautiful and intricate knitted garment, it blows me away- the amount of knowledge and time it must take to make such amazing pieces.

here they are, all blocked out. this was actually my first time blocking socks, i am overall happy with the results, but the ankles and toes could use some improvement.
when i first started designing and knitting my socks for the contest, i was planning on keeping them a surprise until they were finished. that's why i never really gave any details on them which i'm sure some people have been scratching their heads at. as you all know, i couldn't keep them a secret long, especially with all of the obstacles i ran into, i was bursting at the seams to vent my frustration and get some advice! so here are the most basic details: the yarn i used to knit the socks is knit picks palette yarn in clover and natural (i can't remember the actual name of the cream/neutral yarn, but you get the idea!) i ordered one ball of each color and despite my constant fear and frequent blogging about running out of yarn, i was super relieved that i didn't!! i did however try to stretch the amount of yarn i had by using equal parts of both colors; mostly green on the legs and natural on the feet of the socks, as the background for the stripes.

i love the way these pictures turned out! my husband took them....who knew he was such a budding photographer!?!?
i used short row toes and heels on these socks, and learned some very valuable lessons them along the way: mainly that while knitting them you must concentrate!!! they are not suitable for mindless knitting in front of the tv OR in the presence of ANY small children who command your attention!! it is not easy or fun to go down a few rows and fix a mistake, i usually had to rip out the entire heel and start over. AND, use the damn stitch markers!!! even though we tend to think that we can do everything by ourself and rarely use markers anymore *at least that's what i was thinking!!* it makes the process infinitely easier, especially if you're not familiar with wrapped stitches, in a smaller gauge they are hard to distinguish from regular knit stitches. even if you are paying pretty close attention....
i also learned some new techniques with this project; intarsia, knitting backwards and intarsia in the round. i've already gone over intarsia and knitting backwards in some of my previous posts, but i haven't yet mentioned intarsia in the round. i found alot of different techniques online, but the one that i thought would be easiest to learn and execute in the short amount of time i had was one which incorporates yarn overs and decreases to simulate flat knitting. i found this great site that has a complete explanation of what makes intarsia in the round so problematic *until you know how to do it*. it also goes over a couple of the techniques all in one place so that you don't have to go to numerous sites to find them. if at all possible, you may want to have a swatch if you're reading the instructions for a technique that you plan on using so that you can follow along with her, otherwise it can get a little confusing.
this is the seam that is created by using the yarn over/decrease method of intarsia in the round. i actually like the way it looks, the effect is like a tiny corset, with the yarn overs on each side. i might use it in the futute as a design feature.
here is a VERY brief run-down of how the yarn over/decrease technique works: let's pretend we are knitting a sock, toe up. we knit the toe, the foot and the heel and then we want to knit an intarsia motif on the leg of the sock. we'll decide that we're going to put the "seam" on the back of the leg, straight up from the ankle. so we knit to the exact middle-back of the ankle, yarn over and then knit back the way you came (this is where you can use the knitting backwards, instead of turning and purling). you then knit the "second row" following your intarsia chart, until you reach the stitch before the yarn over. purl the last stitch together with the yarn over.
*TIP: if you're knitting backwards and you have a hard time figuring it out, you can turn your work around and pretend you're going to purl 2 together to see how to do it. AND you can do this for any stitch while knitting backwards, or if you get absolutely stuck and don't know what to do, just turn the work, purl it, turn it back around and continue knitting backwards!!*
once you've done your decrease you will be back on a knit row! since we decreased, we'll need to add another stitch, so at the beginning of the next row, yarn over. knit the "third row" following your chart and when you get back to the seam where the yarn over is, this time you'll be doing a SSK decrease. again, yarn over at the beginning of the row. continue on in this manner until you are finished with your intarsia motif and then you'll return to knitting circularly for the rest of the leg and cuff of the sock.
a front and back view of the intarsia motif and the seam created in back. and there's nothing wrong with your eyes or your computer, the zero on the left IS extremely wonky! it resulted from too many yarn ends and not enough space to weave them in. i'm going to go back and try to fix it. real problems in the real world. not every knit is perfect!!
BUT, it's all done now.... well, the knitting is done. i told myself that i would be happy if both socks were bound off and i had the pictures to prove it by friday *after all, you only have to send in pictures, so i wasn't too worried about weaving in the loose ends, i could just stuff them down inside the sock!!* but now i have a 4 day cushion to do finishing touches! and believe me, for all the color changes in those socks, i'm going to need 4 days to weave in the ends!
and now i'm getting the anxiety that i believe most knitters experience once they near the end of a project: i have tons of patterns that i'd love to jump into right away, but no yarn.... or money in this modern-day depression. my heart is already sinking!! i would love to get back to spinning, though. i feel guilty for my poor wheel!i did mention in once post that i was allowing myself a tiny bit of spinning time, only when the socks became brain-numbing and i needed a break. the wool i chose for this couldn't have been any better! i got the four ounces of wool *unknown breed, but wonderful nonetheless* from my june FOTM swap partner. the colors are so calm and relaxing, and it was the first time in a really long time that i allowed myself to spin without overthinking it. i didn't care what it looked like in the end, where or how the colors met up, how many WPI it was.... i let my mind wander, while serendipity took over. that's the best kind of spinning.
i did take the plying seriously though. dictatorially serious. i've been so frustrated with the fact that all of my yarns are at least slightly over-twisted and it really started to bug me. i know everyone says that a balanced skein of handspun is something that "comes with time" but i'm not one of those people who likes to sit around and wait. i'm a little more proactive.
to pin-point exactly what i was doing wrong, i would ply about a yard of singles and stop and do a ply-back test. it was then that i noticed something that was always there, but i had never paid any attention to: when you attatch a leader to your bobbin, you take it up through the flyer hook (or hooks) and then down through the wheel's orrifice. it was that very small couple of inches of yarn that led to my breakthrough!! i had plied a yard's length of singles, with my right arm extended out behind me. when i started the ply back, i noticed a reaction in the yarn between the oriffice and the bobbin: the second you bring your arm forward, you release the tension that you were holding the yarn under and in a matter of seconds, the yarn behind the orrifice would untwist, sometimes drastically.....but only with yarn that did not have enough ply twist!!!
but if i pulled about five inches back off the bobbin (towards me) and put more ply twist into it, it wouldn't unwind! in fact, if i watched it closely, you can see it either lose twist *not enough ply twist*, stay exactly the same *balanced yarn* OR extra twist from what i had just plied would travel BEYOND the orrifice and into that yarn. so i knew if it unraveled i needed to put more twist into my yarn and if it gained twist i had too much ply twist (which can be easily fixed by pulling about 5 more inches of yarn off the bobbin and the twist will even itself out a bit). it is a revelation for me, although i can't tell you how tedious it is to do this for an entire 4 ounces of fingering-weight singles!! of course, you wouldn't have to do it that way, you could use it periodically to test your consistency. i was just determined to spin a FULLY balanced yarn! and i did.


Look at that skein!! and that's before washing!! and there's all that's left of the singles! i really love this yarn. i don't have a name for it yet, but the colors remind me of an ocean somewhere in greece.


Saturday, August 9, 2008
deadlines, goats, and inspiration
**Notice the date below, yes, this is how long it is taking me to get posts up for right now.... i have taken the PC to the DR. to get it checked, and have been stirring it up on the verizon technical support lines..... hehe, i'm very proficient at those angry *MY (fill in the blank) hasn't been working and i want it fixed NOW or i'm cutting off my contract and you won't get one red cent from me!!!* that certainly gets their attention! so hopefully the problem will be fixed soon!
**
originally written: july 30th
the deadline approaches. i have 2 weeks and 2 days to submit pictures of my creativity 350 project for judging!! i'm getting nervous i'm not going to finish! i have completed the feet and heels of both socks and am half way through knitting the intarsia motif (the numbers 3-5-0) on the right sock. it may seem weird that i decided to knit them in this strange order, but there a couple of reasons for that.
the first *and most important* reason is that i'm terrified i'm going to run out of yarn. since we were broke when i ordered the yarn, i ONLY bought what i thought i would need to make one pair of socks, without allowing any extra yarn for screw ups!! but then i made a decision that i thought would make the socks more interesting; instead of knitting both intarsia designs horizontally on the leg of the sock, i would knit the left sock's motif horizontal and the right one vertical. that complicated the knitting incredibly, not necessarily in terms of skill level, but in terms of time and the amount of yarn i had.
that brings us to reason #2 for my strange order of operations: most socks can be worn on either foot, but since i did stripes, this makes a visible line of color changes and the smartest way to hide that is to position it on the inside of the leg, also meaning if you wear the left sock on the right foot, you will see the line of color changes on the outside of the foot, where everyone is looking at and *should be* admiring your hand knit sock.
#3: since i'm knitting the intarsia on the right sock vertically, it is taller AND will take more yarn than the same motif knitted left to right. to make sure that i wouldn't run out of yarn and also to know how tall i would have to make the left sock, i had to knit the right one first. i hope everyone's still following me after that!!
once i'm done knitting the intarsia on the right sock, i will put the entire sock's worth of live stitches on hold with spare double points or waste yarn (instead of binding off so i can go back and knit the ribbing later) then i will have to decide where i'm going to put the design on the left sock. i'll have a TON of length to work with, but i'm 90% sure i'll place the motif in the top 1/4 of the length and somewhere it can be seen from the front and/or outside of my leg.
i did have a good diversion from all my creativity 350 knitting this week! an odd sequence of events led me to a VERY small town fiber festival, one that i had never heard of, no less! in november of 2007, i attended my first fiber festival in boerne, texas, called kid 'n ewe. i was actually shocked once i got there at how big it was for being in a kitschy boutique-style town.
there were 2 large buildings with vendors only, and a third *the llama barn* that was for llamas and alpacas mostly, but also had a great selection of anything and everything that could possibly made from the animals, and of course, spinning fibers and fleeces.
one of my favorite vendors there was kai ranch mohair, a texas based business. they had the most beautiful mohair i've ever seen, in the most beautiful and fun colors and most of it was locks, locks and more locks *my favorite*!!! a couple of months ago, i had pretty much used up all of the precious locks i purchased from them, so i emailed them to see what they had available. although i didn't end up buying from them at the time, they added me to their email list for store updates. out of the blue, i get a message from them asking everyone to come by and visit them in junction *a town about an hour away from where i live* for the !!!NEW!!! fiber fair running concurrently with the TAGRA *texas angora goat raisers association* show. i was stoked!! this was the first time i'd ever heard of the show, and for everything you hear about texas being one of the world's largest producers of mohair, i've never seen or heard of ANYTHING going on locally, so i had to go.
i started looking around the web for more info on the show, concrete times and vendors and such, with absolutely no luck. so, i asked my mother in law to go with me and we figured we had a 50% chance of having a good time, and at the very least, it would get me out of the house and away from chaos for a couple of hours.
after driving an hour AND getting lost *thanks to the LACK of advertising they had done for their show* we finally made it! as soon as we got a little closer, i got nervous. there was one tiny covered but open-air pavillion type structure and all i could see was goats *which wasn't a surprise since the main purpose of this get-together is an angora goat show and sale* and to be honest, i'm not quite sure what i WAS expecting, as this is only my second public fiber foray, but i'll just say, i was a little stunned. driving around the other side of the building, we did see ONE area where someone had set up shop, so we decided to reserve judgement and go have a look around.


i spent most of my afternoon spinning and talking at her table. she encouraged me to perfect spindling so that i could teach it to others *which i've always wanted to do* and for some reason she was more than overtly suggesting that i open up a shop at some point *as i've said a million times, there are no spinning supplies, teachers or resources within 45 minutes of where i live. i don't think i'll ever forget her. and now i'm convinced that i was where i was supposed to be that day. 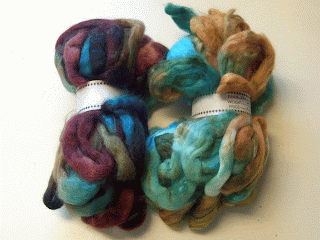
**
originally written: july 30th
the deadline approaches. i have 2 weeks and 2 days to submit pictures of my creativity 350 project for judging!! i'm getting nervous i'm not going to finish! i have completed the feet and heels of both socks and am half way through knitting the intarsia motif (the numbers 3-5-0) on the right sock. it may seem weird that i decided to knit them in this strange order, but there a couple of reasons for that.
the first *and most important* reason is that i'm terrified i'm going to run out of yarn. since we were broke when i ordered the yarn, i ONLY bought what i thought i would need to make one pair of socks, without allowing any extra yarn for screw ups!! but then i made a decision that i thought would make the socks more interesting; instead of knitting both intarsia designs horizontally on the leg of the sock, i would knit the left sock's motif horizontal and the right one vertical. that complicated the knitting incredibly, not necessarily in terms of skill level, but in terms of time and the amount of yarn i had.
that brings us to reason #2 for my strange order of operations: most socks can be worn on either foot, but since i did stripes, this makes a visible line of color changes and the smartest way to hide that is to position it on the inside of the leg, also meaning if you wear the left sock on the right foot, you will see the line of color changes on the outside of the foot, where everyone is looking at and *should be* admiring your hand knit sock.
#3: since i'm knitting the intarsia on the right sock vertically, it is taller AND will take more yarn than the same motif knitted left to right. to make sure that i wouldn't run out of yarn and also to know how tall i would have to make the left sock, i had to knit the right one first. i hope everyone's still following me after that!!
once i'm done knitting the intarsia on the right sock, i will put the entire sock's worth of live stitches on hold with spare double points or waste yarn (instead of binding off so i can go back and knit the ribbing later) then i will have to decide where i'm going to put the design on the left sock. i'll have a TON of length to work with, but i'm 90% sure i'll place the motif in the top 1/4 of the length and somewhere it can be seen from the front and/or outside of my leg.
i did have a good diversion from all my creativity 350 knitting this week! an odd sequence of events led me to a VERY small town fiber festival, one that i had never heard of, no less! in november of 2007, i attended my first fiber festival in boerne, texas, called kid 'n ewe. i was actually shocked once i got there at how big it was for being in a kitschy boutique-style town.
there were 2 large buildings with vendors only, and a third *the llama barn* that was for llamas and alpacas mostly, but also had a great selection of anything and everything that could possibly made from the animals, and of course, spinning fibers and fleeces.
one of my favorite vendors there was kai ranch mohair, a texas based business. they had the most beautiful mohair i've ever seen, in the most beautiful and fun colors and most of it was locks, locks and more locks *my favorite*!!! a couple of months ago, i had pretty much used up all of the precious locks i purchased from them, so i emailed them to see what they had available. although i didn't end up buying from them at the time, they added me to their email list for store updates. out of the blue, i get a message from them asking everyone to come by and visit them in junction *a town about an hour away from where i live* for the !!!NEW!!! fiber fair running concurrently with the TAGRA *texas angora goat raisers association* show. i was stoked!! this was the first time i'd ever heard of the show, and for everything you hear about texas being one of the world's largest producers of mohair, i've never seen or heard of ANYTHING going on locally, so i had to go.
i started looking around the web for more info on the show, concrete times and vendors and such, with absolutely no luck. so, i asked my mother in law to go with me and we figured we had a 50% chance of having a good time, and at the very least, it would get me out of the house and away from chaos for a couple of hours.
after driving an hour AND getting lost *thanks to the LACK of advertising they had done for their show* we finally made it! as soon as we got a little closer, i got nervous. there was one tiny covered but open-air pavillion type structure and all i could see was goats *which wasn't a surprise since the main purpose of this get-together is an angora goat show and sale* and to be honest, i'm not quite sure what i WAS expecting, as this is only my second public fiber foray, but i'll just say, i was a little stunned. driving around the other side of the building, we did see ONE area where someone had set up shop, so we decided to reserve judgement and go have a look around.

the judging line-up. i couldn't get everyone in one frame *see below*. the main purpose of the TAGRA show is the judging and selling of the angoras. there were more goats that weren't in the judging.


there were all age groups showing their goats- the youngest is the little boy above, and the oldest was a woman of around 70!! it was pretty funny to see them wrestling with the animals!!

this was the biggest goat there, i'm pretty sure he got first, but i wasn't paying that much attention. my husband called right after they started pulling goats out of the line for placement.
*i would like to say that this paragraph is making me sound like the bitchiest fiber snob, but i assure you, i'm not!!! it's just that there are a lot of little back-woods towns in the hill country of texas that can be VERY creepy, not in a "deliverance" sort of way or anything, but i'm NOT your average texas gal, ya'll. sometimes my look isn't readily accepted in the stock show/rodeo type of atmosphere, and, in alll fairness, they're probably terrified of me, too. this was the merging of two very similar and yet intensely different worlds and people*
we got out of the car and took in our surroundings for a moment..... there were more angora goats in attendance than people, and 3 vendors *one of which was an elderly woman selling her handmade goods*. we walked in and stopped at the first vendor we came to- a husband and wife angora breeding team from oklahoma.
they had some really nice rambouillet fleeces *and a couple of prize winning charcoal-colored angora fleeces *which was new for me, because i have never even seen a colored angora goat, much less been able to closely examine one's fleece!!* i began chatting with the ladies there, asking questions about the fleeces, admiring a 1980's ashford traditional and ashford's new golden child, the joy. in less than 15 minutes, she was asking me if i wanted to take her joy for a spin! how could i turn that down?!?! while i was spinning we continued talking, and as soon as i mentioned my LACK of spindling skills. she rushed to her car and brought back a bag with two home made spindles and some roving.
i reluctantly conceeded to giving her spindle a try. my hands had forgotten the movements, and i felt quite awkward and self conscious *i've always been a little ashamed that i could never pick up the most basic spinning, which is practiced all over the entire planet..... by four and five year olds* she was watching me very closely, giving me tips when i needed them and letting me figure it out on my own when i could. her intuitiveness was inspiring. although i was still using my park and draf method, within a couple of minutes, i didn't feel so awkward anymore! and as my brain soaked up some of her experience, the roving began to flow freely from my hands and turn into yarn.
we got out of the car and took in our surroundings for a moment..... there were more angora goats in attendance than people, and 3 vendors *one of which was an elderly woman selling her handmade goods*. we walked in and stopped at the first vendor we came to- a husband and wife angora breeding team from oklahoma.
they had some really nice rambouillet fleeces *and a couple of prize winning charcoal-colored angora fleeces *which was new for me, because i have never even seen a colored angora goat, much less been able to closely examine one's fleece!!* i began chatting with the ladies there, asking questions about the fleeces, admiring a 1980's ashford traditional and ashford's new golden child, the joy. in less than 15 minutes, she was asking me if i wanted to take her joy for a spin! how could i turn that down?!?! while i was spinning we continued talking, and as soon as i mentioned my LACK of spindling skills. she rushed to her car and brought back a bag with two home made spindles and some roving.
i reluctantly conceeded to giving her spindle a try. my hands had forgotten the movements, and i felt quite awkward and self conscious *i've always been a little ashamed that i could never pick up the most basic spinning, which is practiced all over the entire planet..... by four and five year olds* she was watching me very closely, giving me tips when i needed them and letting me figure it out on my own when i could. her intuitiveness was inspiring. although i was still using my park and draf method, within a couple of minutes, i didn't feel so awkward anymore! and as my brain soaked up some of her experience, the roving began to flow freely from my hands and turn into yarn.

crowning achievement of the day- the tiniest little skein of handspun i have ever seen!! it's size does not measure the importance of it, however- i'll probably keep it for the rest of my life.
i spent most of my afternoon spinning and talking at her table. she encouraged me to perfect spindling so that i could teach it to others *which i've always wanted to do* and for some reason she was more than overtly suggesting that i open up a shop at some point *as i've said a million times, there are no spinning supplies, teachers or resources within 45 minutes of where i live. i don't think i'll ever forget her. and now i'm convinced that i was where i was supposed to be that day.
oh, yeah and i almost forgot!! i couldn't leave without buying something!! i couldn't resist getting some beautifully dyed kid mohair roving (right). but along with the old favorites, they had added something new to their store- faux cashmere!!! it's actually nylon..... i've seen it on some of the websites, and heard it was devilishly soft and luxurious, but i've never seen *or felt* it in person!! i can only describe the feel of it as a mixture of angora bunny fur and bamboo!!! *but when i said that, the lady looked at me like i was on crack, so it may not be accurate!!* it also has a hint of the sheen of bamboo. i couldn't get large quantities of either fiber, but i can't wait to spin them up!!! lisa *who does the dyeing at kai ranch* said that the cashmere takes up dye extremely well.

aren't those color ways awesome?!?! i L-O-V-E the faux cashmere (right)
Saturday, July 19, 2008
electronic woes
hello world! my updates have been taking increasingly longer to get posted because, once again, we're having computer related problems. i don't think it's the actual computer this time, i think it's our internet service. i've been having to write posts in about 4 sessions, and since blogger automatically saves your post every time there's a pause in the typeing, it's making the process exponentially slower. it's a really great feature when everything's running at peak performance, but not when your connection is so crappy. so, you'll have to forgive me if these updates are taking longer than normal!
there is something i would like to mention here before i get into any knitting news and forget. while knocking around the knit picks website ordering the yarn for my creativity 350 socks, i saw that that they will be debuting a new sock book called "Socks a La Carte". it is exactly the kind of book i've been searching for, and the current subject of most of this blog; sock toes, feet, legs and cuffs, that you can mix and match at will! just my kind of sock knitting!!! and although you won't be able to get your hands on it until december 31st, you can preorder it on amazon right now and have it automatically arrive at your doorstep after it drops!! i'm really excited about it and i'll most likely be buying it as soon as we have the money! i hope it's worth it, though, considering that i thought "Sensational Knitted Socks" was going to be formatted like that, but it has actual patterns. i like *recipes*.
so, after the last post i did some researching online looking for possible heels for my creativity 350 socks. i did come across some great resources *talked about and linked to in the last post* and came to the conclusion that a simple round heel would be fastest. after almost finishing it though, i didn't really like how it looked, it came out VERY square??? i think the numbers were a little bit off for my sock, which is not to say that you shouldn't try it on one of your own projects.
the square-looking heel would not have mattered to me one bit, had it fit well. after all, it looks fine once you put an actual heel in it. but of course, the sock came nowhere close to having a good fit! in my newest book, Sensational Knitted Socks, the instructions for a toe up sock were; knit the toe, knit the foot of the sock until it reaches your ankle bone (the big round bone on the outside of your foot, near the ankle, if there's any confusion) and when the foot of the sock is long enough to reach that point, you should start knitting the heel. i thought that sounded easier than all the measuring i normally do. it wasn't.
so i frogged the "round" (*SQUARE!!*) heel and a little bit of the foot, and went back to my tried and true method of measuring the foot- i take my total foot length minus two inches for the heel. for me that measurement is 7 1/2 inches, so once i reach that point, i know i'm reading to start knitting the heel of my sock. works like a charm every time for me! i also try my sock-in-progress on alot at this stage of the knitting, just to make sure everything feels right.
once i got back to the right length, it was once again time for the heel. i'm not sure what came over me at this point, but without second guessing myself, i started knitting short rows again!?!?! i just felt like i needed to do it. and although i had a few problems, i was surprised to find myself fixing my mistakes with ease!!! it seemed as though all the experience i'd gained recently from constantly ripping out and reknitting those short rows had finally paid off! and let me tell you, fixing short rows is not easy! it sort of feels like when you first start knitting and you watch someone drop a stitch and go down a few rows to fix a mistake, and it just blows your mind!! but once i knew what everything was supposed to look like, it was easier to tell what i had done wrong. i will admit, at one point i had to frog about 4 rows and redo them, but it was much better than frogging the whole heel! i had found my short row zen- i finished the heel without any major melt downs or cursing! it was nice.
at the beginning of the short row heel, i had an epiphany- when i was researching how to knit intarsia in the round, i came across a technique called "knitting backwards"; most commonly used while knitting flat, but has MANY other creative uses. now, i'm not going to get into instructions here, but i will be giving links so you can look it up!! a most basic explanation of knitting backwards is: without turning your work around, you will be making purl stitches on the back side of your knit fabric while viewing from the front of the knit fabric. here's a visual; instead of knitting stitches from the left needle to the right needle, the stitches you just knit will be on the right needle, and your left needle will become your working needle.
there is something i would like to mention here before i get into any knitting news and forget. while knocking around the knit picks website ordering the yarn for my creativity 350 socks, i saw that that they will be debuting a new sock book called "Socks a La Carte". it is exactly the kind of book i've been searching for, and the current subject of most of this blog; sock toes, feet, legs and cuffs, that you can mix and match at will! just my kind of sock knitting!!! and although you won't be able to get your hands on it until december 31st, you can preorder it on amazon right now and have it automatically arrive at your doorstep after it drops!! i'm really excited about it and i'll most likely be buying it as soon as we have the money! i hope it's worth it, though, considering that i thought "Sensational Knitted Socks" was going to be formatted like that, but it has actual patterns. i like *recipes*.
so, after the last post i did some researching online looking for possible heels for my creativity 350 socks. i did come across some great resources *talked about and linked to in the last post* and came to the conclusion that a simple round heel would be fastest. after almost finishing it though, i didn't really like how it looked, it came out VERY square??? i think the numbers were a little bit off for my sock, which is not to say that you shouldn't try it on one of your own projects.
the square-looking heel would not have mattered to me one bit, had it fit well. after all, it looks fine once you put an actual heel in it. but of course, the sock came nowhere close to having a good fit! in my newest book, Sensational Knitted Socks, the instructions for a toe up sock were; knit the toe, knit the foot of the sock until it reaches your ankle bone (the big round bone on the outside of your foot, near the ankle, if there's any confusion) and when the foot of the sock is long enough to reach that point, you should start knitting the heel. i thought that sounded easier than all the measuring i normally do. it wasn't.
so i frogged the "round" (*SQUARE!!*) heel and a little bit of the foot, and went back to my tried and true method of measuring the foot- i take my total foot length minus two inches for the heel. for me that measurement is 7 1/2 inches, so once i reach that point, i know i'm reading to start knitting the heel of my sock. works like a charm every time for me! i also try my sock-in-progress on alot at this stage of the knitting, just to make sure everything feels right.
once i got back to the right length, it was once again time for the heel. i'm not sure what came over me at this point, but without second guessing myself, i started knitting short rows again!?!?! i just felt like i needed to do it. and although i had a few problems, i was surprised to find myself fixing my mistakes with ease!!! it seemed as though all the experience i'd gained recently from constantly ripping out and reknitting those short rows had finally paid off! and let me tell you, fixing short rows is not easy! it sort of feels like when you first start knitting and you watch someone drop a stitch and go down a few rows to fix a mistake, and it just blows your mind!! but once i knew what everything was supposed to look like, it was easier to tell what i had done wrong. i will admit, at one point i had to frog about 4 rows and redo them, but it was much better than frogging the whole heel! i had found my short row zen- i finished the heel without any major melt downs or cursing! it was nice.
at the beginning of the short row heel, i had an epiphany- when i was researching how to knit intarsia in the round, i came across a technique called "knitting backwards"; most commonly used while knitting flat, but has MANY other creative uses. now, i'm not going to get into instructions here, but i will be giving links so you can look it up!! a most basic explanation of knitting backwards is: without turning your work around, you will be making purl stitches on the back side of your knit fabric while viewing from the front of the knit fabric. here's a visual; instead of knitting stitches from the left needle to the right needle, the stitches you just knit will be on the right needle, and your left needle will become your working needle.
why i DO want to mention it is to tell you about my experience with the technique. i think this may be the one most creative and innovative improvements on the basic, thousands-of-years-old knitting that we do in every project, every day. and especially for me, i'm a little embarassed to admit that 75% of the time, i fall asleep about 10 rows into a knitting session.... most often on a purl row. knitting has always been relaxing for me, but now i find it a little too relaxing! and then there's a more common plague of the knitting community.... PURL STITCHES!!!! i have no idea why so many people say they hate purling, but for me personally, i'm half as fast on my purl rows, which is why i usually fall asleep on them. i don't know how fast other people knit, and i'm certainly no lilly chin or anything, but in my own mind, i think i'm a pretty fast knitter. and i like it that way. and then there's my other reason to dislike purling, though it may be a less common affliction of purlers out there, i'm not sure, i've never told anyone this: my hands feel drunk or something while purling! seriously, they're totally ineffective!! i'm not sure what that's all about, but it's true! it just doesn't feel right. so for anyone who may hate purling, for whatever reason- read on, this part of the post is for you!!
now, just like most of my great-idea flashbacks, it was very late at night, like 1AM. i did a search for knitting backwards tutorials on google, and was delighted to find that knitty did an entire article on the subject! of the hundreds of thousands of knitting websites and blogs on the globe, knitty would most definately be in my "top 5 most-trusted knitting websites" list.
since it was so late at night, i ONLY wrote down what i thought i needed to know to be able to execute the technique. i did notice that there were other tips and i still haven't read the entire article, i was on a mission! i went back to the bedroom *where i unforunately have to do ALL my night time knitting, AWAY from the help i can find on the internet because the baby sleeps in the living room*. so i sat down, with my minimalist notes, and picked up my sock in progress. to my surprise, i was knitting backwards with no trouble! i was shocked, it sounded so hard! i knit a few stitches backwards, and the only thing i struggled with was how to hold my working yarn. it was tricky, too tricky for learning a new technique. so i dropped it. the easiest way for me to learn was to first concentrate on how to move the needles. to teach my fingers and hands to do something that i've been doing for years backwards was hard enough on it's own. can you imagine trying to teach yourself to write from right to left?!?! it would take a long time. so, while my hands were still learning, my working yarn would hang dilligently at the back of my knitting until i needed it, and only after i got the needles in place and was reading to make the stitch would i pick it up, make the stitch, and drop it again. and although i'm making it sound harder than it is right now, i was knitting backwards fluently in 10 minutes! for the rest of the night, i knit the heel, picking up the yarn as i needed it, until i was too tired and had to go to bed.
the next morning, i worked on knitting backwards while holding the working yarn. i tried a few different ways of holding it in my hands, i even tried continental. but, i settled on holding it in my right hand, like i usually do, with one modification: when i need a little extra tension, i use my middle finger to hold the yarn down a little more, making it easier to control the yarn.
now that i learned to knit backwards, i look forward *no pun intended* to purl rows!! it hasn't proved to be necessarily faster than purling *for me* but it's certainly more entertaining!
so, the moral of the story is: try something new!! this technique was pretty darn easy for me, even though i thought it sounded like a lot of work! but if i hadn't tried it, i would never have found that out! i LOVE trying new techniques, SO SPICE UP YOUR KNITTING LIFE! and perhaps the most important thing to remember is: you don't have to do anything a certain way, if it's not working for you, try something else! experiment a little and see if you can find a way to make it easier on yourself!
ok, here's where you can find out more about knitting backwards!
knitty summer 2006 (note that they call the technique knitting back backwards)
rexenne's you tube video for knitting backwards (if you want to see the technique in action, i suggest this video. she uses very big needles, so you can really see how the it's executed. she does knit with the working yarn in her left hanb, but everything else is the same for right handed knitters. it's a little bit long, and if you've never watched one of rexenne's videos, you may be surprised at her quirky style, but i've watched all her spinning videos and she's good at explaining things, so stick with it!)
all of rexenne's videos can be found here
the knit witch's knitting backwards you tube video (no frills video!! this is strictly technique here, but she is a traditional right handed knitter, if you don't like rexenne's left handed style!)
Sunday, July 13, 2008
this little piggy:
sock toes
as some may have guessed, my time is still being devoted to knitting on my creativity 350 project. i'm trying to stay focused, which can be very hard for a right-brainer like me! the only other thing i've allowed myself to do with my free time is about an hour of spinning my june fiber of the month swap roving every couple of days. pretty good, if i do say so myself!
i thought i'd had about all i could stand of the 350 knitting, until a knitting angel sent me an IM on craftster. it was my june FOTM swap partner! she is really sweet, and through conversing for our fiber trade, we found out we have alot in common. she sent an "are you out there?" IM, after not hearing back from me, and i couldn't help but unload all my project stress on her! after all, i don't have anyone in my personal *not internet* life that knits or even an LYS to seek help or consolation from!
*warning; in the next paragraph, i let my creativity 350 project out of the bag. i just couldn't keep it a secret anymore, it's too exhausting NOT to write about it here! there was no stopping it either, the words just exploded from my hands to the key board! so here is the original paragraph, unedited!*
after reading my pitiful message, she sent along some encouraging words. and, although i knew how thoughtful it was of her, i didn't feel particularly enthused to pick up my needles right then and there. but, at my next knitting session, i was able to finish the toe of the sock *whoops, i let my super top secret project out of it's knitting bag!!! honestly, i'm too exasperated trying to keep it under wraps on the blog anymore! so there you go, my super top secret creativity 350 project is(!!)........SOCKS!!! i know, who would have guessed?!?! this is only my 3rd pair in a row!*
that stupid freakin short row toe!!! after barely making my way through it on the yarn over cable socks, here it is again!!! why didn't i just go with a different toe? because i didn't know any others to look up off the top of my head, and i don't have a book saying "here are the toes, here are the heels, put them together however you like!" not to mention, i was just plain being lazy about it. so after struggling on it *see all my yarn over cable sock rants* it just magickly happened! it was so smooth, and natural. the knitted fabric just poured from my hands! my knitting angel has some well-deserved knitting karma coming her way!! and she's not even a knitter.
so, after knitting the toe, the foot of the sock went by faster than i ever imagined! *after all those stupid short row toes, i forgot that i actually AM a good knitter, i just learned that i SUCK at short row toes!* the first thing i thought when i started designing these socks was: "STRIPES!!", and since i was doing the intarsia motif on the leg, i knew i'd at least put the stripes on the foot of the sock, if not use them as the back ground of the leg, too. but right now, i'm only knitting the foot. so, what type of stripes should i do? fat? skinny? painstakingly thought out? or randomly knitted? and then, from the corner of my brain where i store all of those really great ideas or techniques for future inspiration or use: "FIBONACCI stripes!!!" and so, it was decided. i would LOOSELY base my stripe sequence on a method called fibonacci knitting, which i saw demonstrated on knitty gritty.
a word about fibonacci knitting:
i would really love to explain this to you, but for the sake of time i'm directing you HERE. that link will take you to the knitty gritty web page that FULLY explains what the fibonacci numbers are, and how to incorporate them into your knitting. the tutorial is beautifully written and SUPER easy to understand, plus it gives a very interesting mini-history lesson about Leonardo Fibonacci and the way he came up with his fibonacci sequence
so, if you're interested, but telling yourself you can't do it because it involves math and numbers, trust me when i say- i suck at math!!! THIS IS EASY, i promise!!! it's only numbers, no math included! the work is done for you! if i can do it, anyone can *and if you've been reading my blog for any length of time, you'll believe me, because if there's anyone who can mess up the simplest knitting pattern, it's ME!!!*
okay, back to your regular scheduled blogging:
now here's where i start to fudge my numbers *this is why i said my stripes would be LOOSELY based on 350*. so, i already know that i can't use the number zero, because i obviously can't knit ZERO rows of anything!!! so i had to substitute the zero with the number one.
then, i had to make sure my numbers (now 3-5-1) were actually included in the fibonacci sequence. so, using the link above, i checked it out, and was grateful that all of them were there! so, that was easy, right?! yeah, too easy.
i soon realised that with my TINY gauge, not only would the stripes not look good, but changing colors that often would be down right tedious, and my knitting would probably look like CRAP from the frequent joining of new colors. i had also decided early on that i wanted my pair of socks to really stand out. i wanted to people to notice them and wonder why the hell my socks had "350" so proudly emblazoned on them, and subsequently come ask me about it! the stripes needed to be bold and graphic. so, i figured the easiest solution would be to double the numbers: 3 to 6, 5 to 10 and 1 to 2.
it was easy to knit the stripes this way, and i really like how they turned out- just bold enough, but not like striped witch stockings or anything! there is a visible line down the length of the foot, giving away the exact point where i changed colors, but i decided i would put that part of the sock to the inside of the leg, where it would be less visible to someone viewing the sock from the outside.

sneak preview!!! here the foot of the sock is completed, at the left you can see the line of demarcation where i joined the new colors. it's not too pretty, but i will tighten up the joins in the finishing stage of the sock and hopefully it'll look better!

here is a closeup of the joins. this will face the inside of the foot.

i thought i'd had about all i could stand of the 350 knitting, until a knitting angel sent me an IM on craftster. it was my june FOTM swap partner! she is really sweet, and through conversing for our fiber trade, we found out we have alot in common. she sent an "are you out there?" IM, after not hearing back from me, and i couldn't help but unload all my project stress on her! after all, i don't have anyone in my personal *not internet* life that knits or even an LYS to seek help or consolation from!
*warning; in the next paragraph, i let my creativity 350 project out of the bag. i just couldn't keep it a secret anymore, it's too exhausting NOT to write about it here! there was no stopping it either, the words just exploded from my hands to the key board! so here is the original paragraph, unedited!*
after reading my pitiful message, she sent along some encouraging words. and, although i knew how thoughtful it was of her, i didn't feel particularly enthused to pick up my needles right then and there. but, at my next knitting session, i was able to finish the toe of the sock *whoops, i let my super top secret project out of it's knitting bag!!! honestly, i'm too exasperated trying to keep it under wraps on the blog anymore! so there you go, my super top secret creativity 350 project is(!!)........SOCKS!!! i know, who would have guessed?!?! this is only my 3rd pair in a row!*
that stupid freakin short row toe!!! after barely making my way through it on the yarn over cable socks, here it is again!!! why didn't i just go with a different toe? because i didn't know any others to look up off the top of my head, and i don't have a book saying "here are the toes, here are the heels, put them together however you like!" not to mention, i was just plain being lazy about it. so after struggling on it *see all my yarn over cable sock rants* it just magickly happened! it was so smooth, and natural. the knitted fabric just poured from my hands! my knitting angel has some well-deserved knitting karma coming her way!! and she's not even a knitter.
so, after knitting the toe, the foot of the sock went by faster than i ever imagined! *after all those stupid short row toes, i forgot that i actually AM a good knitter, i just learned that i SUCK at short row toes!* the first thing i thought when i started designing these socks was: "STRIPES!!", and since i was doing the intarsia motif on the leg, i knew i'd at least put the stripes on the foot of the sock, if not use them as the back ground of the leg, too. but right now, i'm only knitting the foot. so, what type of stripes should i do? fat? skinny? painstakingly thought out? or randomly knitted? and then, from the corner of my brain where i store all of those really great ideas or techniques for future inspiration or use: "FIBONACCI stripes!!!" and so, it was decided. i would LOOSELY base my stripe sequence on a method called fibonacci knitting, which i saw demonstrated on knitty gritty.
a word about fibonacci knitting:
i would really love to explain this to you, but for the sake of time i'm directing you HERE. that link will take you to the knitty gritty web page that FULLY explains what the fibonacci numbers are, and how to incorporate them into your knitting. the tutorial is beautifully written and SUPER easy to understand, plus it gives a very interesting mini-history lesson about Leonardo Fibonacci and the way he came up with his fibonacci sequence
so, if you're interested, but telling yourself you can't do it because it involves math and numbers, trust me when i say- i suck at math!!! THIS IS EASY, i promise!!! it's only numbers, no math included! the work is done for you! if i can do it, anyone can *and if you've been reading my blog for any length of time, you'll believe me, because if there's anyone who can mess up the simplest knitting pattern, it's ME!!!*
okay, back to your regular scheduled blogging:
now here's where i start to fudge my numbers *this is why i said my stripes would be LOOSELY based on 350*. so, i already know that i can't use the number zero, because i obviously can't knit ZERO rows of anything!!! so i had to substitute the zero with the number one.
then, i had to make sure my numbers (now 3-5-1) were actually included in the fibonacci sequence. so, using the link above, i checked it out, and was grateful that all of them were there! so, that was easy, right?! yeah, too easy.
i soon realised that with my TINY gauge, not only would the stripes not look good, but changing colors that often would be down right tedious, and my knitting would probably look like CRAP from the frequent joining of new colors. i had also decided early on that i wanted my pair of socks to really stand out. i wanted to people to notice them and wonder why the hell my socks had "350" so proudly emblazoned on them, and subsequently come ask me about it! the stripes needed to be bold and graphic. so, i figured the easiest solution would be to double the numbers: 3 to 6, 5 to 10 and 1 to 2.
it was easy to knit the stripes this way, and i really like how they turned out- just bold enough, but not like striped witch stockings or anything! there is a visible line down the length of the foot, giving away the exact point where i changed colors, but i decided i would put that part of the sock to the inside of the leg, where it would be less visible to someone viewing the sock from the outside.

sneak preview!!! here the foot of the sock is completed, at the left you can see the line of demarcation where i joined the new colors. it's not too pretty, but i will tighten up the joins in the finishing stage of the sock and hopefully it'll look better!

here is a closeup of the joins. this will face the inside of the foot.
i would like to note, however, if you were to knit a pair striped socks using a "knit 10 rows in main color, knit 10 rows in contrasting color" pattern, the joins would likely be less noticeable. my theory on this is they're easier on the eye because they are farther apart than the stripes with only 2 knitted rows, so we perceive them as being less noticeable.

this is an illustration of the aforementioned theory of how the thickness of the stripes affects the look of the color joins.
on to the heel! my first thought after finishing the toe and foot of the sock? there's no way in hell i'm going to do another short row technique here!!! so i logged on to ravelry, and began searching the sock knitting groups for an alternatives. i was massively dissapointed. so instead of wasting my time searching the internet *as some of you may already know: i'm completely useless when it comes to searching* i went to the "tips and techniques" group on ravelry and posted this message, a call for names of ANY heel or toe known to man, so that you could look for them by name, making the search infinitely easier. the message has already gotten a few replies, which isn't alot, but the information given is worth it's weight in gold! i've checked out all the links provided in the first 3 replies, and although some of the websites were abandoned EONS ago, the information is still good, and most of the internal links (ie; click here to go to "socks, page 2") are still good.
so please, if you read this and my previous posts about my infuriating yarn over cable sock experience and feel like i'm reading a page out of your sock knitting book, CHECK OUT THAT LINK!!! and if you're not already a member on Ravelry, you should sign up today, even though they have a waiting list *which is already much smaller than it was when i applied* and it is a challenge in itself to figure out how to work all the totally amazing *FREE* features their website has to offer, IT'S TOTALLY WORTH IT!!!
so that is where my first sock stands as of now- next i'll decide what heel to use and with any luck, that will go faster than the toe, because i can't much more paranoia about not finishing these socks by the deadline of the contest, this has come to be so much more important to me than i ever could have imagined!! i really want to be able to show people what i can do, and hopefully everyone will like them and appreciate how much work and thought was put into them!
so please, if you read this and my previous posts about my infuriating yarn over cable sock experience and feel like i'm reading a page out of your sock knitting book, CHECK OUT THAT LINK!!! and if you're not already a member on Ravelry, you should sign up today, even though they have a waiting list *which is already much smaller than it was when i applied* and it is a challenge in itself to figure out how to work all the totally amazing *FREE* features their website has to offer, IT'S TOTALLY WORTH IT!!!
so that is where my first sock stands as of now- next i'll decide what heel to use and with any luck, that will go faster than the toe, because i can't much more paranoia about not finishing these socks by the deadline of the contest, this has come to be so much more important to me than i ever could have imagined!! i really want to be able to show people what i can do, and hopefully everyone will like them and appreciate how much work and thought was put into them!
Subscribe to:
Posts (Atom)
